Lighting is key to any media or video shoot. Our guest contributor Naomi Chen shares a few of her pro tips!
Natural lighting
A lot of the times, content creators try to “dim” or “soften” their studio lights. Natural sunlight already helps provide a more organic look in your videos. However, because the weather is constantly changing, your shoots become dependent on the sun. You also may not be able to create certain effects for your videos.
You want to place the subject in front of or next to a window (great for sitting in front of a webcam!) (Editor’s note: place the subject facing the window) depending on the weather. If the sunlight is too strong, you can try diffusing it with blinds. Try not to place your subject behind a window (Editor’s note: i.e. don’t have the window behind you), unless you are going for a specific effect. The best time to shoot with natural lighting is during golden hours. [Editor’s note: The golden hours in photography are approximately 1 hour after sunrise and 1 hour before sunset. At these times, the sun’s low position in the sky produces a soft and warm light with longer shadows.]
Tip: You can always use a reflector to bounce or fill light. Use a white reflector and hold it below the subject to bounce light onto them. To mimic a studio lighting setup, hold the reflector high. You want to angle to direct the sunlight down on the subject of your shoot. When the light source is behind the subject, you can hold the reflector directly across from the light.
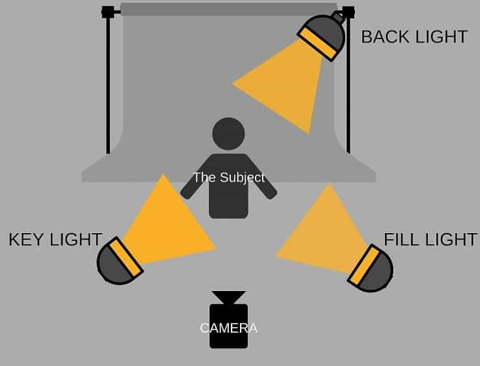
Three point lighting
Three point lighting is the most common lighting setup for video series, interviews, etc. The purpose of this setup is to extend the coverage of light and avoid harsh shadows on the subject. Overall, it helps create depth and a dynamic effect.
As the name suggests, there are three components of three point lighting: key light, fill light, and back light.
- Key light is the primary source of light that shines directly on the subject. It is usually positioned at about 45 degrees angles to the subject.
- Fill light is softer than key light. It serves to fill the shadows on the subject’s face, and it is generally placed on the other side of the camera. Fill light is placed at a slightly lower angle than key light. It fills the areas of shades to avoid dramatic shadows on the subject caused by key light. The beauty of three point lighting is that you can adjust the three elements to achieve the desired effect of your shoot.
- Back light serves to create depth for the subject; it also separates the subject from the background. Back light is placed at the back of the subject. Most of the time, however, if you are simply filming a YouTube video, you should be fine without a backlight.
Tip: when you edit your videos in post [production], the easier way to create emphasis is to increase and decrease the size. For example, you can make the most important part of your sentences / video content as close ups instead of as wide shots. Simply by playing around with size throughout the video, your final product will already have a more dynamic look to it.
Ring light versus Softbox
The main difference between a ring light and a softbox is that ring lights illuminate more directly, whereas softbox lights are more evenly distributed.
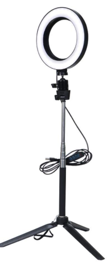
Ring light is especially great for headshots, portraits, vlogs, and makeup tutorials. With a ring light, you are able to set up the camera or phone through the center, which is also what a lot of people like about it. However, given the circular shape of ring light, it may create what’s called a “catchlight” in the subject’s eyes. The direct illumination also means it will not be great at lighting a wide shot, but it is awesome for close-ups.
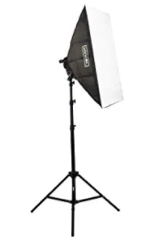
An entry level lighting setup that is recommended for filming videos at home are the fluorescent softboxes. They are budget friendly and fairly easy to set up! The drawback is that you cannot adjust the brightness. Because softboxes are quite spread out, some details may get lost in the subject. However, this should be fine for your videos at home.
LED panels last longer as they are more energy efficient. They come with a slider at the back that allows you to adjust the brightness of the panels. Compared to softboxes, LED light is more direct, but diffusion sheets can be purchased to create a softer light spread.
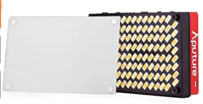
My personal go to is the Aputure AL-MX LED video light. It is essentially a portable credit card sized light source that you can carry anywhere to illuminate a scene. It also allows you to adjust the brightness, as well as the warmth of the light. If you are taking photos of food, for example, you want that warm tint for a welcoming and delicious look. There is a diffuser too that you can put on top of the LED panel. The AL-MX LED works well especially if you are travelling a lot. However if you have a fixed studio or shoot location at home, feel free to get a softbox or a LED ring light. Additionally, make sure the light bulbs in your house do not interfere with your lighting setup! For example, if an overhead light is of a different color than your setup, film in another room or try to cover it up.
Product name: Aputure AL-MX, Amaran AL-M9 Upgrade Version 128 LED Bi-Color On-Camera Video Light, TLCI/CRI 95+, 2800-6500K Adjustable, 3200lux@0.3m Booster Mode, Aircraft-Grade Aluminum Body
Consistency is key
Consistency is important for content creators who own a YouTube channel or are working on a series. Have you ever watched YouTube videos that show up in dramatically different lighting with each upload? A lack of consistency in lighting setup communicates a lack of professionalism. Likewise, you probably want to build a style particular to your channel or video series anyway, so don’t let overexpose or harsh shadows get in your way!
Guest post written by Naomi Chen
Naomi is a multimedia content creator, public speaker, and event coordinator studying media production at Ryerson University. Naomi moved to Toronto from Beijing in 2013, where she spent her weekends co-hosting a show on CCTV. She is currently working on voiceovers, videos, and brand marketing. Naomi is also a part time yogi and full time smoothie enthusiast. Connect with her on Instagram @naomichen.ca or https://naomichen.squarespace.com/